Showing posts with label gaming. Show all posts

Tuesday, July 16, 2013

Crysler's Farm

I was setting up a battle scenario for Crysler's Farm last week, and didn't realize that the Canadian battlefield was actually hosting a battle reenactment this past weekend for the bicentennial of the clash. It seems odd, since the battle took place in November, that the organizers would hold it in the height of summer. Anyway, here are some maps (and tables of organization below) I drew up based on Donald Graves' book Field of Glory, which is the definitive historical survey of the battle.

The Americans were advancing down the St. Lawrence River towards Montreal, the capture of which would starve out all British forces west of that point. Secretary of War John Armstrong was playing the role of supreme commander, directly ordering Major Generals James Wilkinson and Wade Hampton to advance with their armies towards the city. However, both generals were turned back by much smaller British forces. Canadian militia also played a significant role.

The defeat of a large American division by a much smaller British "Corps of Observation" at Crysler's Farm is usually attributed to the poor training of the American regulars. I see something different going on. The American soldiers were not being used to their strengths. They were trained (officially) according to William Duane's infantry manual, which took the drill of the French 1791 book (which was heavily influenced by von Steuben and the Prussians) and introduced many of the new practices used by the French Army up until 1811 or so. This meant the Americans were fighting like Frenchmen. They tried to fix the British line in place with a advance in line by Covington's Brigade, while the other two brigades tried to outflank the Brits by marching by column through the woods to the north.

It was a poor use of inexperienced men. The two brigades got tangled in the woods and were handily defeated by the British who were able to refuse their line by wheeling by wings (a standard maneuver which is regarded with some misplaced awe by modern historians.) Throughout the battle, the Americans tended to fire individually, which is actually the suggested drill in Duane's manual. This kind of musketry turned out to be less effective than the tight British platoon volleys--but there's evidence that American regiments continued to open fire by files during the 1814 campaign when they were much more successful. Another factor in the battle was that a large battalion had been formed as a boat guard over the supply flotilla for the division, and took detachments men from all of the regiments instead of just using certain companies or a single regiment. This weakened the American line while throwing together a mixed bag of troops into a provisional unit: a mistake that the British would tend to make during the Niagara campaign.

(Note that I use NATO symbols for the units: X for brigade, III for regiment, II for battalion, wing, division or squadron, and I for company.)


Saturday, July 6, 2013

Map of the Battle of Chippawa 1814


An overview sketch of the Battle of Chippewa, 1814.
 My version of the battle. It was fairly easy to stage, but difficult for the British to win, since they were somewhat outnumbered. At right is BG Winfield Scott's 1st Brigade, at left is MG Peter Porter's 3rd (Light) Brigade. British MG Phineas Riall's Brigade consisted of the 1st (Royal Scot's) Foot and the 1/100th Foot on the front line, supported by the 1/8th Foot in the second line (most authors don't bother mentioning which battalion, since British Army battalions were usually scattered in different brigades). The three light companies were detached to serve independently.

Wednesday, July 3, 2013

Battle of Chippawa Wargame


This Friday is the 199th anniversary of the Battle of Chippewa. Family responsibilities allowing, I'm hoping to get out to the Niagara area to reenact the battle next year. Brigadier General Winfield Scott led his famous brigade into the battle, reminding them that the day before they had celebrated the Fourth of July in camp, and that this day they would make a new anniversary to remember. Unfortunately, the stunning victory his men (and the militia and Iroquois warriors under General Peter Porter) won over hardened British regulars has not become immortalized the same way that the "dawn's early light" over Baltimore that same summer has. Nevertheless, the battle put the British on notice that the American Army was now a tough, professional force. 


I've been working on a battalion-level rules system for tabletop gaming. It's less dependent on the Battlecry! set: as long as you have six-sided dice, some sort of hex or squared board, and figures to represent the different armies you're good to go. Below is the list of units involved in the battle. To my knowledge, there isn't a good order of battle available online for Chippawa (apparently not spelled "Chippewa"), so I've compiled mine from various sources, including Joseph Whitehorne's While Washington Burned: The Battle for Fort Erie, 1814, and Richard C. Barbuto's Niagara 1814: America Invades Canada. Both books are excellent resources for the history buff, living historian, or wargamer.

American Forces, 5 July 1814
Unit Level (NATO) Unit Name
(Commanders)
Strength (Figures) Morale/Ability Weapon
(Infantry)
XX Left Division


MG Brown

5

X 1st Brigade


BG Scott

5

III 9th Inf. 348 (4) 5 Musket (I)
III 11th Inf. 433 (4) 5 Musket (I)
III 22nd Inf. 229 (2) 5 Musket (I)
III 25th Inf. 370 (4) 5 Musket (LI)
I Pioneers 20 (1) 6 Musket (LI)
X 2nd Brigade


BG Ripley

4

III 21st Inf. 676 (7) 4 Musket (I)
I --Treat's Co. 30 (1) 4 Musket (LI)
III 23rd Inf. 349 (4) 4 Musket (I)
X Porter's Brigade


MG Porter

4

III PA Volunteers 753 (8) 4 Musket (LI)
III Indians 600 (6) 5 Musket (N)
II Hindman's Battalion


Maj. Hindman


4

I Towson's 5 guns (3) 3 Med. Guns
I Biddle's 3 guns (2) 4 Heavy Guns
I Ritchie's 2 guns (2 3 Med. Guns
I Williams' 5 guns (3) 4 Siege Guns
I 2nd Light Dragoons 68 (1) 5 Sabres

British, Canadian, and Native Forces, 5 July 1814
Unit Level (NATO) Unit Name Strength Morale/Ability Weapon
XX Right Division


MG Drummond

3

X Riall's Brigade


BG Riall

4

II 1/1st Regt 400 (4) 5 Musket (I)
II 1/100th Regt 350 (4) 4 Musket (I)
II 1/8th Regt 380 (4) 4 Musket (I)
II Light Cos. 300 (3) 5 Musket (LI)
X Pearson's Brigade


Lt Col. Pearson

4

III Lincoln Militia 300 (3) 3 Musket (I)
III Mohawks 400 (4) 5 Musket (N)


Tuesday, June 11, 2013

Gaming the Battle of Fort Meigs p1: Miller's Charge

William Sebree's depiction of Miller's Charge on a map drawn a year or two after the battle.

Most serious war games tend to generate a flurry of cryptic game peices, and this one is no exception. To keep things as simple as possible I've reduced the amount of game info on each peice to three: unit type/ weapon (LI= light infantry, HA= heavy artillery, etc.), starting strength on the bottom left corner, and starting morale on the bottom right. Actually, the only purpose of these counters is to identify each unit or group of units on the map--unlike a lot of wargames you don't have to consult the numbers constantly or (God forbid) stack them on little hexes.

The first challenge was finding the unit strengths and order of battle of the units that were involved in Miller's Charge. I put together this list based on estimates and the best primary sources I have available. Unit quality (morale) was more intuitive to produce. I assigned morale points based on the need to keep the scenario relatively balanced and reflect the experience of the different units.

 
Colonel John Miller's Charge (1 strength point=10 men)

Side
Unit
Strength
Stats
British
Grenadier Co., 1/41st Regiment
2 officers 100 men
10/5 muskets G


Light Company, 1/41st Regiment
2 officers, 86 enlisted
8/5 muskets LI


1st Co, 1st Essex Regiment
2 officers, 36 enlisted
4/3 muskets I


2nd Co, 1st Essex Regt.
2 officers, 36 enlisted
4/3 muskets I


Sac Indians
50 warriors
5/4 muskets N


Wyandot Indians
40 warriors
4/5 rifles N


Pottawatomie Indians
50 warriors
5/4 rifles N


Royal Artillery
1 six-pounder
1/3 artillery FA


Royal Artillery
1 5.5 inch howitzer
1/3 howitzer FA


Royal Artillery
1 5.5 inch mortar
1/3 mortar HA
American
Colonel Miller
1 mounted officer


Croghan's Co., 17th US
30 men
3/ 4 musket I


Bradford's Co., 17th US
30 men
3/ 4 musket I


Langham's Co., 19th US
20 men
2/ 4 musket LI


Elliot's Co., 19th US
30 men
3/ 4 musket I


Nearing's Co., 19th US
60 men
6/ 3 musket I


Major Alexander
1 officer


Petersburgh Volunteers
2 officers 64 men
6/5 musket I


Greensburgh Rifles
1 officer 12 men
2/5 rifle R


Pittsburgh Blues
1 officer 25 men
3/5 musket I


Sebree's Co., 10th Kentucky Rgt.
3 officers 80 men
8/4 musket LI


Wood's Battery
1 18-pounder
1/5 HA


Blockhouse No. 5
1 6-pounder
1/3 HA


Blockhouse No. 6
1 6-pounder
1/3 HA

All the artillery units in this scenario are basically immobile and firing in fixed arcs. Blockhouse No. 6's gunports were arranged to sweep the base of the fort's wall, and so it doesn't really enter into the scenario. Likewise there was a section of two 5.5" howitzers posted at (1st Light Dragoons Captain Levi) Hukill's battery just west of Wood's battery, but I assume they were pointed the wrong direction to intervene in the charge.

Below are the unit tokens for the companies and battalion commanders in the scenario.

Set up: Miller's men line up under the guns of the fort, regulars on the left and volunteers and Kentucky militia on the right. Because of how the board was laid out, they didn't have to make the battalion left wheel or protect their open flank as they would have in the actual battle. The fort's artillery is powerful but has limited line of sight on the tangled gulleys and forests to the east.

The British are scattered, with the primary force--the two elite flank companies of the 1st Battalion, 41st Regiment of Foot-- guarding the gun pits. The light infantry have deployed in skirmish order in front of the guns, while the grenadiers wait in cover. The three hill hexs at bottom right represent Indian Hill, the end of a long ridge overlooking the river bank. It overlooked the east side of the fort and offered cover to Indian snipers, who I represent here with a band of Potawatami warriors. The three units at the left end of the board are considered reinforcements and not available until the sixth British turn.


The forts guns open the battle by hitting Indian Hill with suppressive fire.


It's super-effective! The Pottawatomie snipers lose twenty warriors and three morale points under the hail of grapeshot and are forced to fall back to a more respectful distance.


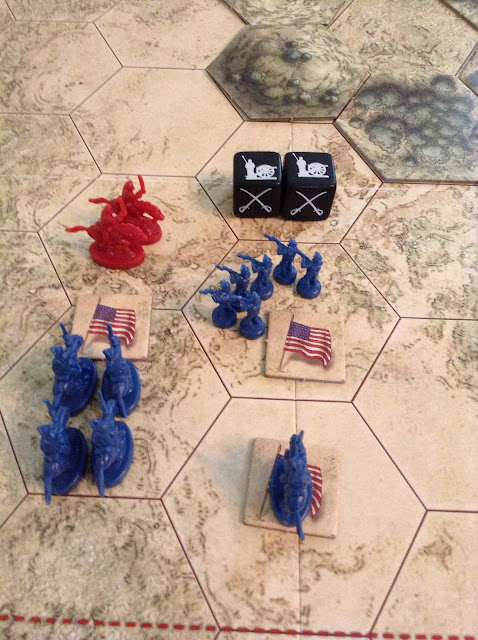
As the rest of the Yankees advance out of the gully, the Greensburg Rifles get hit by a flurry of rifle fire from a Wyandot band  armed with rifles and well hidden in a thicket. All of the riflemen are killed or wounded and the Americans lose their first company of the battle.


By the next turn, the American line has crossed the edge of the ravine. Because of the need to hide the British siege batteries from counter-battery fire, they are not well-sited to repel a charge like this. The Wyandots, up in front, find themselves confronting a whole battalion alone. This time they are decimated by the advancing line and forced to retreat.

The Brits call in their skirmishers and form the flank companies (their main force) into a line of battle on what should be a strong defensive position. With 100 men and high morale, the Grenadiers should be an anchor for the defense. 

(BTW, grenadiers by this period had long since stopped carrying actual grenades, but the ordnance manuals of the period contained instructions for their use, usually in siege works. The Americans had no official flank companies, but several units such as Langham's Company, 19th Infantry seem to have informally taken on the term voltigeurs).

The 18-pounder on Wood's battery roars out. Although the gun crew can't see much of the British battery, they can now see the grenadiers standing in front of it...

The 18-pounder ball rolls through the closely packed ranks, cutting down 10 men and throwing the rest into disorder.

In the next few turns the American line wipes out the Wyandot band and arrives at the front of the batteries. Dug into pits, the British guns could not fire effectively at the charging Americans until now. I'm not even sure if you can count the howitzer and mortar in this situation, since they were set at a high angle to lob shells at the fort (and overshoot it since there were no forward fire observers as in modern warfare!). I considered that in a pinch the artillerymen could load grape and canister into the unwieldy siege weapons and fire point blank, but with less effectiveness than the six-pounder on the right.

The British infantrymen retreat among their guns, so that the Americans have to face close-range artillery fire and musket volleys. Sebree's Company, taking advantage of the closed-off border of the game table, stays in close order and flanks the mortar battery.

(You can still see these batteries today, since they were preserved in the Perrysburg Cemetery...)

 The six-pounder thunders out with a load of canister, destroying Elliot's Company of the 19th Infantry.

The three companies surrounding the 41st Light company pour musketry into its trench. Sebree's company has outflanked the breastwork, so that their fire is even more deadly. 

On the British right, the grenadiers retreat into the brush behind the six-pounder battery. They still have plenty of men but are severely demoralized. The two 1st Essex Regiment Canadian militia companies march up to refuse the right flank, and run into Langham's 20 skirmishers and Croghan's 30 men.

(Canadian militia regiments were raised and named according to the counties from which they hailed. They probably consisted of two "flank" companies of able-bodied, better trained men, and center companies probably made up of half-hearted draftees. Since General Procter's siege of Fort Meigs coincided with the planting season, his Canadian militia were even less reliable than usual. However, the Essex Regiment did include such loyalists and Indian traders as Captains William Caldwell and William Elliot: men who knew the woods and Indian warfare quite well.)

These two companies are of the "draftee" type, and quickly run into trouble against their better trained US Infantry opponents.

The Americans swarm over the breastworks, taking control of the British guns and chasing off the defenders. The 5.5" howitzer in the middle holds out, unable to retreat.

The two American companies flanking on either side fire point-blank on the gun crew...

This roll would wipe out an infantry company, but against the howitzer... they're all misses!

It takes several more tries to finally take out the howitzer.

The battle concludes with the Americans firmly in control of the gun pits, and they industriously set about spiking the cannons. As with the historical battle, it was a costly victory--but one that saved the American camp from a potentially dangerous enfilade fire.

I think in the future I'll give the British more reinforcements to be able to chase the Americans off after the surprise of the initial charge. The Canadian militia should be better, because I now think that elite light infantry outfits like Caldwell's Western Rangers were included in the ranks of the 1st and 2nd Essex Regiment. So alongside the "soft" militia companies, there would probably have been some "hard" companies with better morale and more combat experience--even more so than most of the British regulars in Canada. 

A future play through of this scenario will also make the board wider rather than long, so that Sebree's 80 light infantrymen will have to fend off Indian attacks on Miller's open flank. Also, as commanders can give adjacent units a certain number of "buffs" or bonuses to rolls and morale, I'll give the British Tecumseh to coordinate the counter attack.

In the meantime, I'm going to work on a battalion-level version of these rules so that I can play through larger-scale engagements such as Lundy's Lane and Crysler's Farm. I've also have scenarios in mind for the other two parts of the May 5 battle at Fort Meigs: Colonel Dudley's defeat and the lesser-known Colonel Boswell's charge.

Monday, June 3, 2013

Designing rules for a horse and musket wargame


Order of March sketch found in General Green Clay's papers.

Designing a tactical wargame for the Napoleonic/ Federal Era is very difficult. Most existing wargame rules for the horse and musket period rely upon a certain level of abstraction. However, as General Braddock found out, the difference between victory and total defeat could lie in the maneuvers and steadiness of the smallest units--companies and platoons.

Few tabletop wargames seem to capture the fluidity of a disciplined infantry battalion. In real terms, a battalion's usefulness on the battlefield was in direct proportion to how well it had been trained, and its ability to carry out the maneuvers. A sketchy or needlessly complex book of tactics could send even an experienced battle unit into discord. With this in mind, General Harrison tended to form his troops with the simplest maneuvers, such as marching by the flank, right and left facing, and wheeling.

How can I add manuvuers into a tabletop game based on Battlecry? I dug up some Risk game pieces as a substitute for miniatures or markers, and did an experiment.

An American force formed in line. From right to left: 
  1. A company of Foot Artillery, including one 2-gun section of six-inch howitzers, and two 3-gun sections of six-pounders.
  2. Two companies of Infantry.
  3. A squadron of light dragoons.
  4. Ahead of the infantry, a line of light infantry in skirmish order.
  5. Mounted officers. Company officers (if represented) stand on their unit's flags, field officers stand on their own flags to distinguish from the other units. The tabs in practice  would incorporate unit info such as designations and morale levels.
 Screened by the light infantry, the infantry companies march by files right. Unit flags or tabs are moved to the front to represent flank movement.

The importance of flankers and discipline is illustrated here. Inexperienced troops under fire would tend to get snagged up, throwing the whole column into discord.

The infantry companies in the center have formed a column of companies, which is simply a column marching by a width of one company rather than one file. French tactics of this period emphasized compact columns of one or two companies abreast. 

By wheeling to the right, the center companies form line. The light infantry reforms into a third line company on the left flank. Most infantry tactics involved "packing up" a mass of infantry into a mobile, compact column, then "unpacking" it into a firing line. The other arms, artillery, light infantry and cavalry, play a role in screening this process from enemy firepower and disrupting the opponent's attempts to form his own line.

How did combining these two component systems turn out in practice?

I made up rules for a skirmisher screen: it should not be decisive on its own, but be more resilient to fire. The red figures are British allied Indians: they stand on the hex in a "cloud". The American and British light infantry or riflemen are distinguished by using files, two men in a compact formation. For either type of light infantry, at least one file of two figures (about 20 men) is required to hold a hex.

In this case, the two-hex company of light infantry rolls -2 to their 4 morale points against the Indians, who get an extra -1 because of the dense wooded area. The single dice comes up with a flag, meaning that the whole unit must move back one hex.

The line infantry company gets taken in the flank by a vedette (small skirmishing unit) of British light dragoons. They lose almost all their morale points, which makes it difficult to fire a volley during their next turn. They roll a miss here, and the field officer behind them gives a +1 bonus to their volley. Unfortunately, it also misses

The American light dragoons hurry up, without deploying out of column. This means they can only attack with a portion of their strength, but the charge leaves some breathing room for the infantry by forcing the British horsemen to retreat. A bonus roll for the field officer being there earns them an additional hit: the Brits lose an additional morale point. Behind them a single howitzer has been manhandled into battery (firing position) but has no line of sight to any targets.

Below is a set of new counters for the units:

 Above: I for infantry (any sort, militia or regular), * for officers (co. commanders usually assumed to be part of the unit), R for riflemen, N for natives or Indians, LI for light infantry, FA for foot artillery, HA for heavy or garrison artillery, LD for light dragoons.

Second counter sheet: officers including Captains, Majors, Lt. and Full Colonels, Brigadier and Major Generals.  G for grenadiers, S for sailors, MR for mounted rifles.
 Explanation of the unit tiles. The basic type is printed: particulars are hand written in based on the unit. I'm still not sure how to use officers without unbalancing the game. Perhaps the ability score can determine how often they can give a boost to an adjacent unit, and rank can determine how distant the boosted unit can be. Tiles should be 1"x1" and mounted on cardboard.


Thursday, May 23, 2013

Estimating Combat Strength at Fort Meigs, May 1813

 Colonel John Miller's detachment forms up for a charge under the cover of Fort Meigs' south wall. These 350 men were formed up in a single line of two battalions and one company.

Trying to estimate exactly how many troops General William Henry Harrison had available at Fort Meigs is like herding cats. Even the officers on the scene had a difficult time tabulating their combat strength. Secretary of War General John Armstrong was a micro manager, and expected detailed reports of how many men were present in the field. I have even seen documents where his Adjutant, General Cushing, ordered copies of company-level rolls to be sent to the War Department, monthly. From his office in Washington City, with a handful of clerks and staff officers, Secretary Armstrong was trying to coordinate several field armies and 9 military districts. 

During the late spring of 1813, Secretary Armstrong authorized a total of 7 infantry regiments (each with 10 companies and approx. 1000 men) to join the Northwest Army in the 8th Military District led by General Harrison. Two of these regiments, the 17th and 19th, were already present, but at minimal strength. At Fort Meigs in May, they formed a weak battalion. Another, the 24th Regiment of Infantry, was marching north from Tennessee with about 400 men. The 26th, 27th, and 28th Regiments were being recruited with one-year enlistments in Kentucky and Ohio, while the 17th and 19th sent parties to replenish their ranks from the same region. The seventh regular regiment seems to have been a Rifle unit. As the recruiting drive was going on, Armstrong discouraged Harrison from raising shorter-term militia regiments. 

Not only were the militia regiments seen as a waste of material and pay, but they would be mustered out of service before they could be used for the invasion of Canada. However, Harrison was forced to appeal to Ohio and Kentucky governors Meigs and Shelby to raise troops for the defense of Fort Meigs. As troops were continually moving into and back out of the fort, and small detachments and sick men were scattered everywhere, it was very difficult for the commanders to see how many troops they actually had at the front at any one time. Harrison ordered General Green Clay, in command at Meigs, to give him a report of how many troops were there at the end of the month. This document survives in microfilm at least, although it is very hard to read.

I have gone through and extracted the total strengths of the units posted at Fort Meigs, in order to give a better idea of how many men where stationed there after the siege. Colonel John Miller commanded the combined 17th and 19th US Infantry, while the illegible militia regiment may have been the survivors of Clay's Brigade:
Regiment Officers Present Enlisted Present Officers Sick Enlisted Sick Total
Field and Staff 4


4 officers
Col. Miller's 12 162 (32 NCOs) 6 209 (38 NCOs) 21 officers
441 enlisted
Col. ???'s 25 335 (61) 9 192 (23) 34 officers
611 enlisted
Col. Mills 8 77 (22) 6 78 (23) 14 officers
200 enlisted
Maj. Peter's 8 64 (20) 2 36 (8) 10 officers
128 enlisted
Maj. Alexander's 5 49 (11) 4 41 (11) 9 officers
112 enlisted
Capt. Cushing's 1 32 (10) 0 20 (3) 1 officer
65 enlisted
Total 59 719 (156) 27 576 (106) 93 officers
1557 enlisted
Total from muster


1751 enlisted
2148 enlisted (absent or accounted for)

For practical purposes, I have also attempted to determine how many line companies (the basic combat unit) were present by counting Captains and Sergeants. Each company was authorized 4 Sergeants, and since these men were simply promoted from the rank and file by their company officers, they are probably the best barometer of how many distinct fighting companies were available at the Fort. I've also provided an aggregate of fighting men for each regiment, though companies did vary considerably in strength.

Counting Heads:
Unit Captains Sergeants Est. Companies/ strength
Regulars (17th and 19th) 5 29 7 (441 muskets)
X militia 9 38 9 (611 muskets)
Col. Mills' Ohio Regiment 3 (7 absent) 20 (24 absent) 3 present (200 muskets)
7 absent
Maj. Peters Ohio Regiment 3 14 3 present (128 muskets)
Maj. Alexander's Blues 2 (1 acting Major) 12 3 present (112 muskets)
Cushing's Company 1 4 1 present (65 muskets)
Total 23 Captains 117 33 companies
1557 muskets or rifles
(minus music)

The above figures leave the question, what combat troops were part of the garrison of Fort Meigs during the Siege? Thanks to an analysis of primary sources done by Dr. Eugene Watson during his time as site staff of Fort Meigs Historic Site, as well as my own analysis of primary documents, we can make a rough estimate of the Order of Battle for the American garrison during the siege. I'll arrange the OOB by seniority of service branch, then regiment and include approximate overall strength and number of companies present.

For wargamers, companies should be regarded as the equivalent of a platoon in modern warfare. At Fort Meigs, they were understrength and organized into provisional battalions.

Unit
Role and Arms
Strength
Companies
Staff


Major James V. Ball's squadron, United States Light Dragoons
(2nd US LD and volunteers)
Light Cavalry: sabres, pistols, carbines and muskets.
220
5
Captain Daniel Cushing's Company, 2nd US Artillery
Foot Artillery: heavy and light cannon, muskets.
80-90 (including attached troops)
1
Colonel John Miller's battalion, US Regular Infantry
Infantry: muskets.
200-300
6 (one light infantry)
Major John Alexander's battalion, US 12-months volunteers
Light Infantry: 2 cos muskets, 1 co rifles.
200
3
Captain Peter's Scouts and Spies
Scouts: rifles.
30
1
Indian Guides
Scouts: rifles.
30
1
Col. James Mills' 1st Regiment, Ohio Volunteer Militia
Infantry: rifles and muskets.
100-200
3 (two rifle)
Col. Mills Stephenson's 2nd Regiment, Ohio Volunteer Militia
Infantry: rifles and muskets.
80-90
3
Major Johnson's Battalion, 10th Regiment Kentucky Volunteer Militia
Infantry: muskets.
300
3
Approx. totals


1240
26 companies, viz:
5 cavalry
1 artillery
4 rifles
6 light infantry
10 line infantry

Monday, April 22, 2013

Gaming and Reenacting the War of 1812

The bicentennial of the Battle of Fort Meigs is fast approaching, and as I have been busy working on other projects and starting a new position at work, I've been trying to keep up with my War of 1812 research &c.

One small project that I've been hoping to accomplish this year is to "live-blog" the First Siege of Fort Meigs. From April 24 (the date that the British invasion fleet sailed for Ohio) to May 9 (when the British boarded their ships and retreated back to Canada) I will make daily blog posts of contemporary journals, reports and accounts of the siege.

General Henry Procter's first expedition into Ohio was the largest sustained military operation by an enemy force into the state, except for the raid of General John Hunt Morgan's Confederate cavalry division in 1863. Although the British had forced a series of American surrenders in 1812 and early 1813, they were unable to break the American marshaling point at Fort Meigs, which ultimately doomed their efforts to defend the Detroit frontier.

I've also been playing around with an 1812 war game of my own devising. One of the things I've noticed is that infantry battles tend to go better for whoever fires a volley first.


I had a scenario set up so that a British force would force a bridge crossing and attack an American detachment entrenched near a farmstead. It proved more expedient to send the bulk of the British forces upstream to outflank the American breastworks.

The Shawnee band at top is small, 20 men left out of 40, but armed with rifles and good marksmen. They managed to take out a howitzer before I realized I had mistaken the "soldier" roll for a "cannon" hit on the dice. They were wiped out next turn, but not before distracting most of the Kentucky militia.

While the Kentuckians were distracted near the bridge, most of the rest of the British forces outflanked the Americans and drove them from their breastworks, which are useless when they face the wrong direction. 

The Americans hastily formed a new line perpendicular to their entrenchments, but the Canadians on the right have brought along a cannon. I'm considering rules that allow a cannon to bounce its shot along several connecting targets, which would be devastating in this situation. The Kentucky riflemen on the left are on a hill, which gives them +1 to shoot, but the Wyandot warriors are protected by the breastwork they just captured.

The battle ended quickly once the Americans stabilized their line and brought in their guns and riflemen from the left. Victory conditions are a bit tricky, since the Americans started out in a better position (a lucky howitzer round landed on the British light company and destroyed them to a man early in the game). As in the real war, there was no clear victor this time, but the British suffered the loss of most of their best companies before pulling back.

So far, this game plays pretty fast and furious, with tactical advantages changing hands rapidly. It seems true to my experiences of actually going out with a musket or serving on a gun during a battle reenactment, where battalions and companies move back and forth and often get whittled down considerably or even surrounded. That also dovetails with what I know from researching original accounts of small skirmishes, where a couple of infantry companies would chase and clash with each other through a maze of forest or the confines of a farm. I'm thinking of coming up with rules for a battalion and brigade-level wargame, to deal with bigger battles such as Lundy's Lane or Chrysler's Farm.

Friday, March 8, 2013

Battlecry 1812 variant

I'm working on a war game for War of 1812 miniatures. I wanted to create a variant of Battlecry! (the Command and Colors system), keeping the fun and fast playing aspects of the board game intact, while introducing deeper rules that will be more historically satisfying.

I'll post the entire rules set here later, but the basic idea of this variant is to take advantage of the modular game components of the published set and convert them for War of 1812 company-level tactics.

The War of 1812 was a small-scale war compared to the Napoleonic Wars in Europe. But it used the same formations, weapons and tactics. The building blocks of the armies were companies (and war bands, for the North American Indians who fought). There were tactical formations called platoons and squads (down even to a single "file" of two or three men) but I have rarely if ever seen them used in real life accounts. Generally, the basic unit was the infantry company (which could be "light" "line" or "grenadier" although these distinctions didn't exist in the US Army at the time) of 30-120 men. Disease, desertion and non-re-enlistments plagued the regular companies and they could dwindle in strength quite fast.

Therefore the rules I've created make for a battle game where each player controls a number of different companies (and single artillery pieces) fighting for various objectives. The original rules measure victory by how many of the opposing units each player destroys ("capturing" their flags). My variant incorporates a variety of different objectives depending on the scenario, such as seizing a certain point on the field, delaying an enemy advance, etc.

Companies in the American service were generally called after their captain. If they had any other designation it was as a number (probably from the right of the regimental line; also usually based on seniority of the captain)-- the alphabetic designation for companies wasn't introduced until the 1820s. Likewise there were no official "flank" companies in the US Army, but unofficially some colonels designated their two best companies as "light" troops. "Light" infantry fanned out in open order to screen the rest of the regiment, acting as scouts and flankers.

The British, by contrast, established two elite flanker companies for each combat battalion. However, even the generic line companies might fight as light troops in some circumstances, and a battle-hardened line (fusilier) company might have better skills than a newly arrived light company. One reason why the Americans did not officially establish flank companies, though, is that they based their organization and training off that of the French Army. Napoleon's regiments did incorporate elite companies, but only did so once a regiment had proven itself in battle-- so that the best officers and infantrymen in each battalion could be identified.

Another difference between continental tactics and North American ones was the battalion. Several of the American regiments were supposed to have two combat battalions, but in general each regiment was synonymous with a single battalion. At various times in the war several decimated regiments were incorporated to form a single battalion. In general it's best to say that the second tier of tactical organization was the battalion of several companies (the drill manuals said ten companies, but many field units designated as battalions only had three or four companies).

In this game, each player functions as a battalion or brigade commander. Instead of depending on a card-drawing mechanism to determine what you can do each turn, I assume that each company unit is able to act on its own to the extent of fighting and following orders. The lack of a "orders" system like some war games have gives up the "fog and friction of war" but makes the game considerably more streamlined and rational. Again, in real life we can assume that each company commander was competent enough to order his men to fight an enemy in front of him, and it didn't take too long for a battalion commander to get orders to individual companies.

More than two players can join the game, simply by giving the extra player control of a different faction or group of companies on the field (like the Indians, or mounted soldiers). They can form a team or compete with each other for different objectives (like Tecumseh and General Henry Procter sometimes did).


Each unit represents a company or band of soldiers (or 1-2 cannon). These consist of one miniature or card that identifies the type of unit, on top of a stack of poker chips. The top (blue or red depending on which side) chips represent morale. Morale determines the combat efficiency of a unit and is a combination of such intangibles as mood, training, experience, fatigue etc. Ranged combat outcomes are based on morale, not strength.

The white chips represent strength, roughly 10-12 men per chip. A firing unit cannot cause more strength losses in a target unit than it itself possesses... but it can cause more than one hit. This keeps relatively big single strength units like heavy artillery from wreaking havoc from a great distance, and small units from using a JFK style--"magic bullet" on a numerically larger foe (See below).

Combat is settled by rolling the Battlecry! dice, which have icons of a infantryman, a horseman, a pair of sabres, a flag, and a cannon. In the original rules, each icon only "hits" when the unit type is rolled. For each flag rolled, the defending unit has to retreat one hex, and sabres are wild cards which hit any unit. The number of dice rolled depends on the number of figures in the firing unit and the range or distance it stands from the target. The three different units: foot, horse, and cannon, have different ranges.

My version of the rules uses the original dice-- each infantryman causes a strength hit (limited by number of firing units), etc. Flags are still used for retreats. However, the sabres take morale points rather than strength points from the target. If a unit loses all its morale it must retreat to the friendly edge of the board (leapfrogging any friendly unit that blocks its escape).

If a unit suffers 100% casualties it is considered destroyed and placed on the opposing player's side of the board as a trophy. If any retreating unit is trapped by surrounding hostiles, it is considered destroyed as well.

The different types of units have different weapons and properties--too numerous to account for here. But firing is done by consulting a weapons table (quick and dirty version):

Weapons and their dice to hit by range (hexes)...
Weapon 1 2 3 4 5 6
Musket M -2 -4 X X X
Rifle -1 M -2 -4 X X
Pistol and Sabre M X X X X X
Artillery m+1 M M -1 -2 -2....
Howitzer M -1 -2 M -4 X
The modifiers subtract from the base morale of a unit. In addition, terrain features and leaders might confer or detract points from a unit's firing stats.

You may notice that rifles suffer a -1 penalty at close range. This is meant to reflect the disadvantages rifles had for close range fighting: the long rifle and 1803 Harper's Ferry were not as sturdy, had no bayonets, took about three times as long to reload, and shot a smaller ball than the smooth bores. Pistol and Sabre gives units that were truly equipped as light dragoons a way to attack... but most American mounted units in the west were equipped with rifles or muskets anyway. Howitzers fire "bombs" which have a certain sweet spot of greatest efficiency... but they could also fire canister or solid shot at close range.
If you don't have the Battlecry! or another Command and Colors set, you can simply substitute rolls 1-2 for infantry, 3, 4, 5, 6 for the other results on 1-4 six-sided dice.

I don't have a system for close combat yet: aside from trading devastating volleys at close range, a unit advancing on another one can choose to force it out of its hex (a "bayonet charge") if it simply has a higher combined strength and morale. This is meant to reflect the fact that a well-organized unit could simply walk through a less organized one, and that melee-style close combat occurred only rarely, compared to fire fights at 25-50 yards range.

I've designed these rules with a youth program in mind, so that the complexity and size of a battle can be dialed up or down depending on the age and gaming experience of the participants. I'll be trying to playtest the game as much as possible. What I hope to accomplish is to create a game that is both educational and fun on a beer-and-pretzels level, with enough flavor to make it feel like 1812 combat while abstract enough to learn and play quickly and easily.

Monday, January 14, 2013

Remember the Raisin Part 2

Next weekend I'm heading to Monroe Michigan for a reenactment commemorating the Battle of Frenchtown. The ensuing massacre of wounded prisoners there begat the cry "Remember the Raisin." According to the National Park Service, this battle resulted in the most American fatalities of any single War of 1812 battle.


To conclude the play through of my War of 1812 Battlecry! variant, the Battle of Frenchtown or the River Raisin ended with an American defeat--but perhaps not as decisive as the one that actually happened. This time the Americans crumbled faster than they did historically...

Procter's most solid forces were the 1st Battalion, 41st Regiment of Foot. He had about 270 of them available for the battle, including the elite flank companies, the grenadiers and the light infantry. They made up the lion's share of his regular troops. In this scenario I put them together on the British left flank, but Procter may have inter-dispersed regular companies with his unreliable Canadian units.

In this game, the two flank companies and the two "center" or fusilier companies walk through the weak position of the American 17th and 19th Regiment companies. The Americans flee Chief Roundhead's warriors, running into the relative safety of town.

What happened differently is that the British regulars leveled their bayonets and charged into the Kentucky positions at the Puncheon Fence around Frenchtown. The tactical cover of the fence was nullified and the better British units swarmed over.

Winchester, commanding from the town (in the actual battle he arrived on the American right wing to rally the regulars before being captured by Roundhead. Colonels Lewis and Allen were shot down trying to lead a sortie to reinforce the regulars, leaving Majors Graves and Madison to command the remaining troops), was faced with a dilemma. He could try to counterattack with the Kentucky units and force the British out of their foothold, or make for Hull's Road south of town before Indian forces closed the noose.

He (meaning I) chose the latter. I should clarify that I've written in rules that allow a commander to save points by withdrawing troops before the scenario ends. This is kind of like taking a bet off the table after you find out you lose, but it's more realistic since it allows for tactical victories.

Each unit represents a company of 30-120 soldiers. Individual figures may be detached from a unit as "skirmishers" reflecting the wide use of pickets and light infantry tactics even among line infantry during the war.

Winchester leads his men out of town. On the American left, a scratch force of Kentucky militia and volunteer rifles sends Walk-in-the-Water packing, opening up a path to safety.

The dice on the table track morale levels. Morale reflects the importance of discipline and cohesion relative to a unit's striking power-- or perhaps, for undisciplined groups such as Volunteer Riflemen or Indians, their skill at war or woodcraft.

In the end, only one company of Kentucky rifles is left on the board, along with Winchester (during the actual battle Winchester gave up his chance to make a getaway and was captured trying to rally his men).

To explain the units: below the unit or field officer's name, the first value (left) represents strength, then the type of arm they carry, then "morale". Morale, rather than strength, determines the number of dice a unit rolls to hit a target or attack.
After only 45 minutes of fighting, the British have taken the town and all the objective points, along with destroying two companies of US regulars and bagging two militia Majors (historically, Major Maclanahan was the highest ranking officer to escape).


A number of American units escape down Hull's Road, far more than the approximately 30 men who got away from the historical defeat.


One bright side to the battle for the British is that they are better off at the end than they were historically. The 1/41st has taken few losses and is prepared to fight another battle.