
The Christmas gift I had most anticipated was the 150 anniversary edition of Avalon Hill's Battlecry! Battlecry! is a tabletop war game that uses the Command and Colors rules system. The objective for each player is to capture as many of the opponent's colors (flags) as possible. This is to be accomplished by destroying combat units and killing generals.
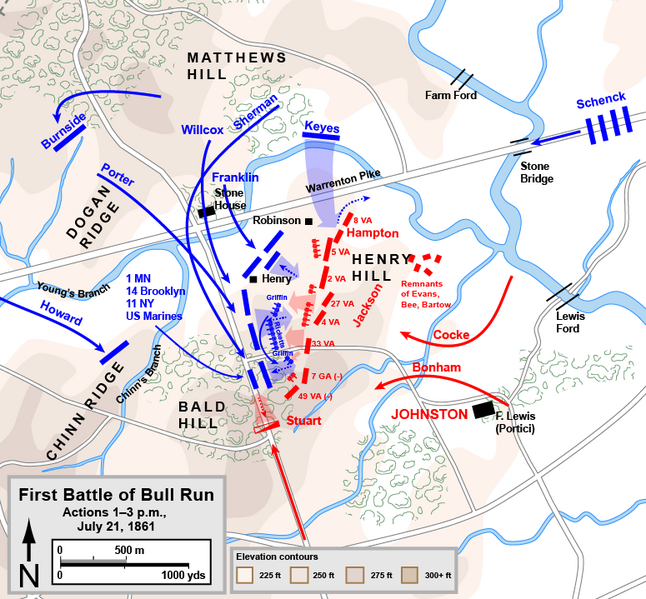 |
| Wikipedia.org map by Hal Jespersen. |
My first scenario was the First Battle of Bull Run. Scale is variable in this highly abstracted game, so in this case each player gets a roughly equivalent array of infantry, artillery, and cavalry. Since the high point of the historical battle was the fight for Henry House Hill, the scenario represents this part of the engagement.

The Union Army under General McDowell attempted to flank the wide-flung Confederate positions along the ridges behind Bull Run. In the event, the brigades of his attacking divisions straggled into the fight on Henry House Hill, and launched a uncoordinated assault. The Union commander starts out with a fairly substantial line of several brigades--however, they can only order a few units to move and fight at a time.

The Confederates, for their part are outnumbered but a brigade of fast-moving cavalry on the left flank may provide a counteroffensive advantage.

First blood. As Federal troops march by the flank to concentrate for an assault, they venture too close to the Confederate lines and begin to get peppered by rifled-musket fire. The hex grid game board is divided into three sections, and orders are generally limited to each section. I was using my own battlefield "experience" to concentrate troops on the left flank but this meant that I needed more "left flank" command cards to order them forward.

Thomas "Stonewall" Jackson's infantry earn their nickname by taking a position atop Henry House Hill. On their right, an artillery battery gets unlimbered for enfilade fire. The game doesn't differentiate between smoothbore gun-howitzers like the 12-pounder Napoleons and longer-ranged rifled artillery like 3-inch ordnance rifles, or between foot and horse artillery for that matter.

The steadfast Stonewall Brigade get run off by two Union infantry regiments in a echelon attack. I didn't know that the defensive advantages of field works and hills don't stack in this game, so I had the Virginians dig in. The Feds are exposing their own right flank in the attack--although flanks are not a liability per se in the simplified Command and Colors rules, exposing a flank can allow opposing forces to concentrate the firepower of several units on one.

The Federal right flank wasn't entirely hanging in air--a regiment of cavalry waited nearby for the inevitable Reb counterattack. However, the Rebs got a reinforcement of one cav regiment which I joined to Stuarts brigade in the spirit of concentration. When the cavalry was unleashed it nearly wiped out the Federal right wing. The Federal cavalry wisely held itself in a defensive line on a hilltop. The game represents Civil War cavalry as fighting mounted, which is only part of the story. The rules as they stand fail to capture the support and flanking function of cavalry units in combat. Luckily, the Command and Colors system is highly flexible for history nerds like myself who want to introduce more nuanced tactics.

The Rebs are slowly forced back on the Union left, but only after a fearful loss of men. There is no time limit, but I feel that at this point in the battle the Rebels would have gotten fresh brigades up to push back the exhausted attackers. The game simulates attrition rather than disorder in the opposing armies. On the Union left, JEB Stuart's cavalry rode too close to the artillery battery and got turned into a fine red mist with double canister (artillery is probably overpowered in the game rules, being effective at range and extremely deadly at close range). The "Battlecry" command card is a trump for the Union, allowing many different units to volley at once.

At last, too much blood is let on either side to continue the Union offensive. Neither side can hold the hill. At this point in the historical battle the green Federal troops panicked before a vigorous Confederate counterattack and stampeded almost to Washington itself. Their equally green rebel opponents failed to pursue with any vigor. When it was over, the First Battle of Bull Run had cost more casualties than any other American battle up to that point. It was only a taste of the carnage to follow.
I'm pretty happy with the Command and Colors system, and particularly with the game board itself. The rules are easy to tweak and modify. The artwork on the box and game cards is atrocious, but the card drawing system to represent the fog of war and initiative works very well. None of the scenarios adequately explains whether you are shuffling around small mobs of plastic figures to represent regiments, brigades, or divisions: this makes it easier to scale the battles up or down, but makes the gameplay much more generic.
 |
| A project fueled by Diet Squirt: rows of early War US Regulars waiting to take the hex grid battlefield. |
I'm working on a company-scale version of this game, using the Battlecry! terrain and hex map, but substituting War of 1812 units and defining the scale as infantry company--cavalry troop--artillery section (1 or 2 guns). I'll add more detail such as infantry skirmishers and cavalry vedettes, and use rules for horse artillery, Indians, and different quality infantry units. It should make for a richer experience. One of the great things about the Battlecry! set is that you can add 1/72 scale plastic figures or make your own counters from http://www.juniorgeneral.org/. I'll post more updates as I continue to game and work on this project.
No comments:
Post a Comment
Note: Only a member of this blog may post a comment.